How to Stop Using Microsoft Account to Login to Atlassian
If you are logging into Atlassian with your Microsoft/Google account and want to set a password you need to unlink it. To do so you need to change your email...

With the static site already created you could manually copy these files to S3 via the AWS console, or via the S3 CLI. However, this adds friction to the writing process. When the files are sent to GitHub via the git push command they can be automatically be sent to Amazon S3 using GitHub Actions for continuous Deployment/ Continuous Integrations (CI/CD).
When working with any type of system like this ensure you review the security and pricing. I got a good start using GitHub Actions based on a great post by johnkevinlosito@.
If you do not already have an S3 Bucket configured for static website hosting complete these steps first. Please note that S3 is a paid service. There is a free tier but by using AWS assets you can incur charges.
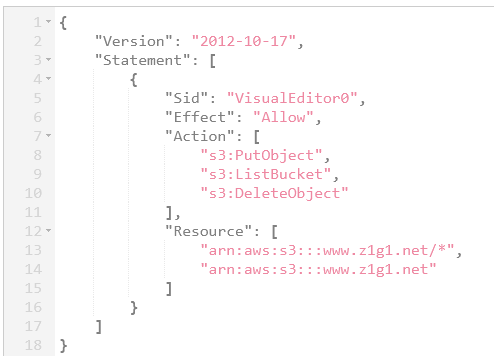
arn:aws:s3:::www.z1g1.net
Resource entry on line 8 ends with a *. This is key because if you don’t inclue this your user will not be able to actually overwrite any existing objectsAt this point you will have a bucket which can serve static HTML content. A future hardening step for this infrastrcuture would be to move away from IAM users to IAM roles.
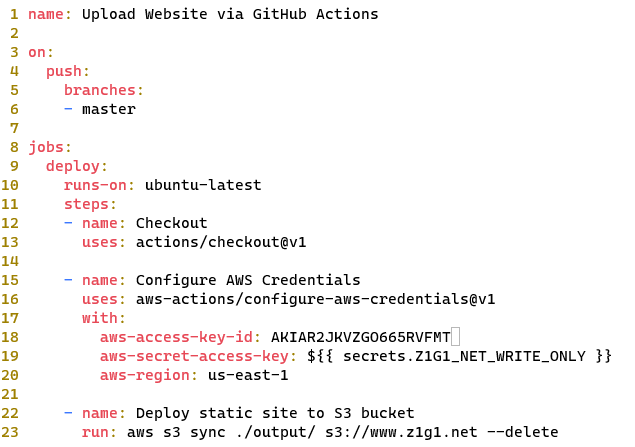
.github which will store the .yml file which defines our GitHub Action mkdir -p .github/workflows. Within this folder create a file called main.yml

action/* does you can look it up under the https://github.com/ACTION_NAME path.Z1G1_NEW_WRITE_ONLY secret created above. You never want to include the Secret Key for an AWS IAM user within a GitHub repo, or any source codeoutput directory to the s3 bucket used to host the site. The --delete at the end of the command will remove files that exist in the destination but not in the source are deleted during syncgit push to this repository your output folder will be written to the specified S3 bucket.There are a lot of moving parts to the setup which is created here. Capturing some debugging info if you run into errors.
PutObject and ListObject permissions. Both of these are required to run the S3 Sync command. In addtion as you want to be able to remove posts from the site, the GitHub action used in this example includes the --delete option. To acomplish this your IAM user needs to have the s3:DeleteObject permission as well."arn:aws:s3:::www.z1g1.net", and the objects inside it "arn:aws:s3:::www.z1g1.net/*",git push after createing the workflow

{
    "Version": "2012-10-17",
    "Statement": [
        {
            "Sid": "VisualEditor0",
            "Effect": "Allow",
            "Action": [
                "s3:PutObject",
                "s3:ListBucket",
                "s3:DeleteObject"
            ],
            "Resource": [
                "arn:aws:s3:::www.z1g1.net/*",
                "arn:aws:s3:::www.z1g1.net"
            ]
        }
    ]
}
name: Upload Website via GitHub Actions

on:
  push:
    branches:
    - master

jobs:
  deploy:
    runs-on: ubuntu-latest
    steps:
    - name: Checkout
      uses: actions/checkout@v2

    - name: Configure AWS Credentials
      uses: aws-actions/configure-aws-credentials@v1
      with:
        aws-access-key-id: AKIAR2JKVZGO665RVFMT
        aws-secret-access-key: $
        aws-region: us-east-1

    - name: Deploy static site to S3 bucket
      run: aws s3 sync ./output/ s3://www.z1g1.net --delete
If you are logging into Atlassian with your Microsoft/Google account and want to set a password you need to unlink it. To do so you need to change your email...
My appearance on Episode 26 of the Modern Cyber podcast with Jeremy Snyder of FireTail.io was recorded at the fwd:cloudsec US 2024 conference
Original post on Zatik Blog
Original post on Zatik’s blog
Your iPhone can be a blackhole of attention. One way to reduce the amount of screentime you spend on it is to make the screen less appealing to look at. You ...
Jupyter Lab notebooks are a great tool for doing data analysis that is either to big for Excel, or you need to repeat the output. Google Colab is a hosted v...
The first post in this series covered creating a site with Pelican the second covered S3 hosting and Github Actions. The series will conclude with configurat...
With the static site already created you could manually copy these files to S3 via the AWS console, or via the S3 CLI. However, this adds friction to the wri...
The site here is built using Pelican which is a static website generator. It allowed you to write webpages in markdown, then build them along with a config f...
I wanted to get started with writing more online in 2022. I decided to setup a static site hosted out of S3 which I will cover in a future post. However, bef...